Attach a remote server to a central server
Prerequisites
Install the remote server using packages.
Step 1: Configure a new Remote Server
As of Centreon version 18.10, a new wizard has been added for defining a new Remote Server on the Centreon platform.
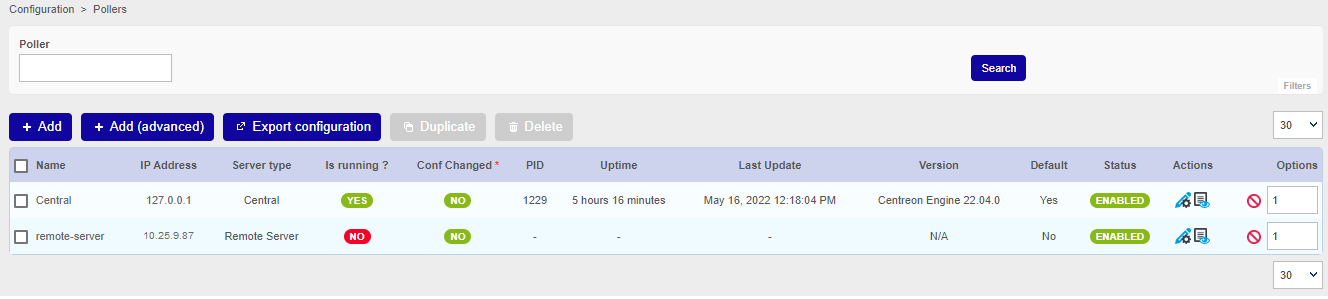
Go to the Configuration > Pollers > Pollers menu and click on Add to configure a new Remote Server.
Select Add a Centreon Remote Server and click on Next:
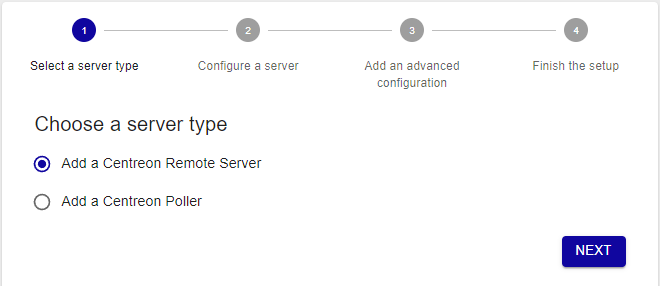
Select the option you want:
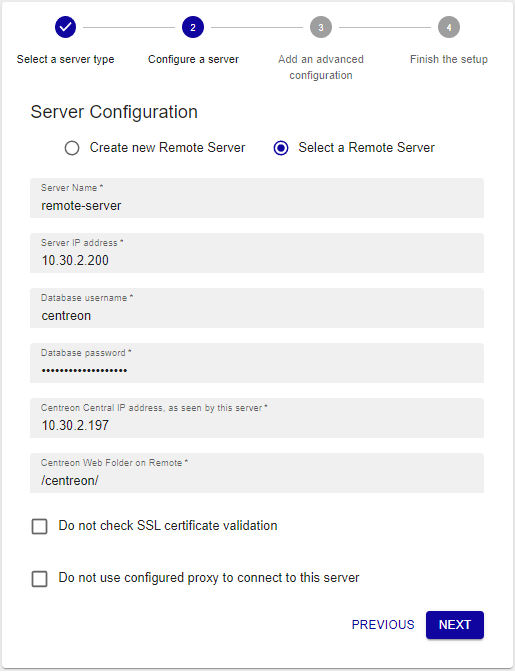
If you enabled the Remote Server option when installing your server, select the option Select a Remote Server, then select your server and fill in the form:
Otherwise, select the Create new Remote Server option and fill in the form:
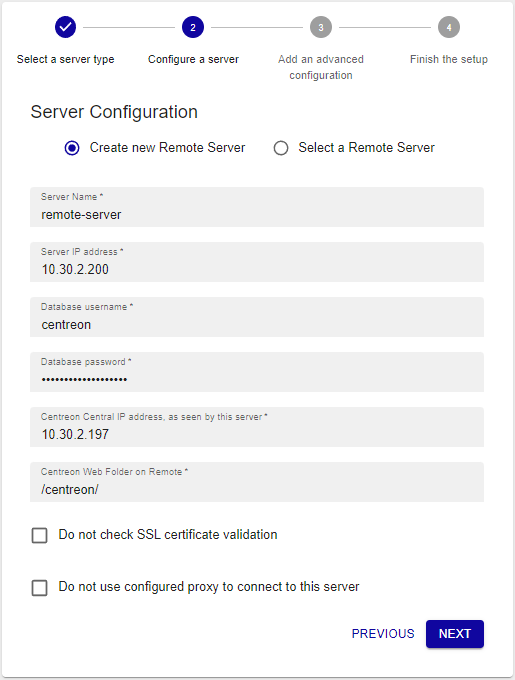
The Database username and Database password are the credentials defined during the installation of the Remote Server.
The Server IP address field is of the following form: [(http|https)://]@IP[:(port)]. If your Remote Server is only available on HTTPS, it is mandatory to define the HTTP method and the TCP port if it is not the default one.
The Do not check SSL certificate validation option allows to connect to the Remote Server using a self-signed SSL certificate.
The Do not use configured proxy to connect to this server allows to connect to the Remote Server without using the proxy configuration of the Centreon Central server.
Click on Next.
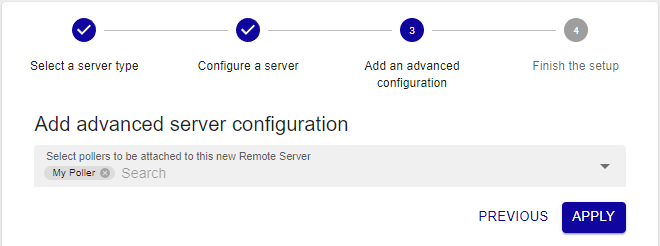
Select the poller(s) to be linked to this Remote Server, then click on Apply:
The wizard will configure your new server:
The Remote Server is now configured:
If you have customized the names of the databases at step 6 of the web installation wizard, carry out the following steps:
Go to Configuration > Pollers > Broker configuration.
Select the broker service for the remote server you want.
On the Output tab, in section Output 1 - Unified SQL, update the name of the database in the DB name field (the default name is centreon_storage), then click Save.
Export the configuration of the remote server.
Restart cbd:
systemctl restart cbd
If needed, check /var/log/centreon-broker/<remote-server-name>.log for issues/errors. (In the example above, the file would be /var/log/centreon-broker/remote-server.log.)
Step 2: Enable communication
The communication between the Central server and a Remote Server is ensured by Gorgone and can be done using ZMQ (with a Gorgone running on the Remote Server, recommended) or using SSH protocol.
- Using ZMQ
- Using SSH (Deprecated)
Select the communication type:
Edit the newly created Remote Server configuration, and select ZMQ as Gorgone connection protocol. Define the suitable port (port 5556 is recommended).
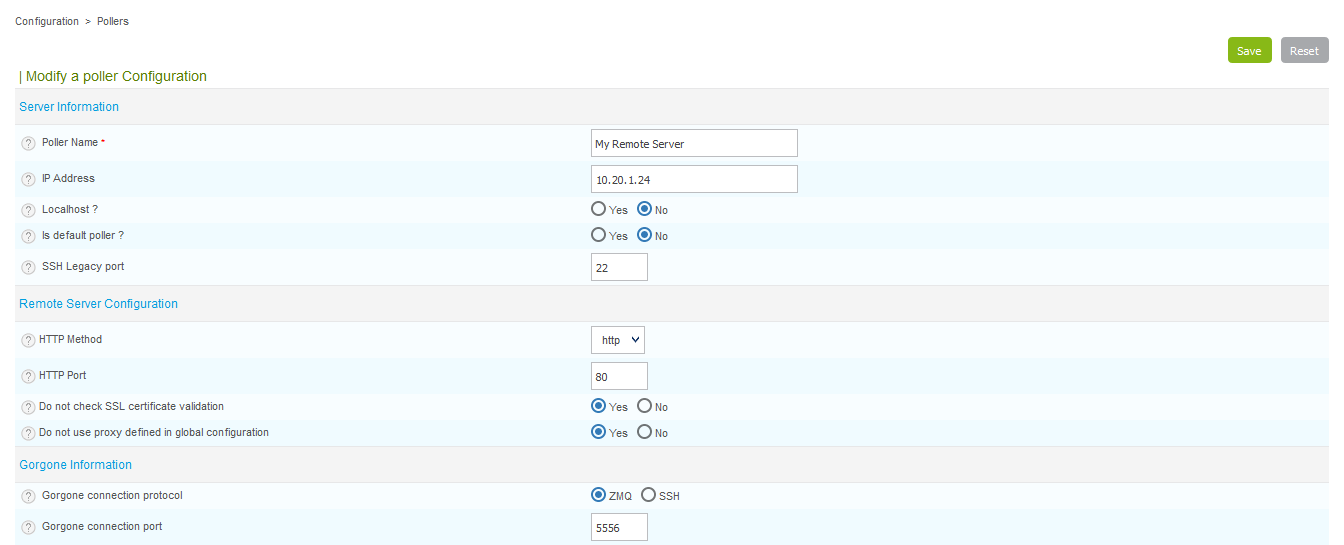
Click on Save.
Note that the SSH Legacy port is not used anymore and will be removed.
If you were using it in custom scripts, consider changing to use Gorgone communication system.
Copy the Gorgone configuration:
From the Pollers listing, click on the Display Gorgone configuration action icon on the line corresponding to your Remote Server

A pop-in will show the configuration to copy into the Remote Server terminal. Click on Copy to clipboard.
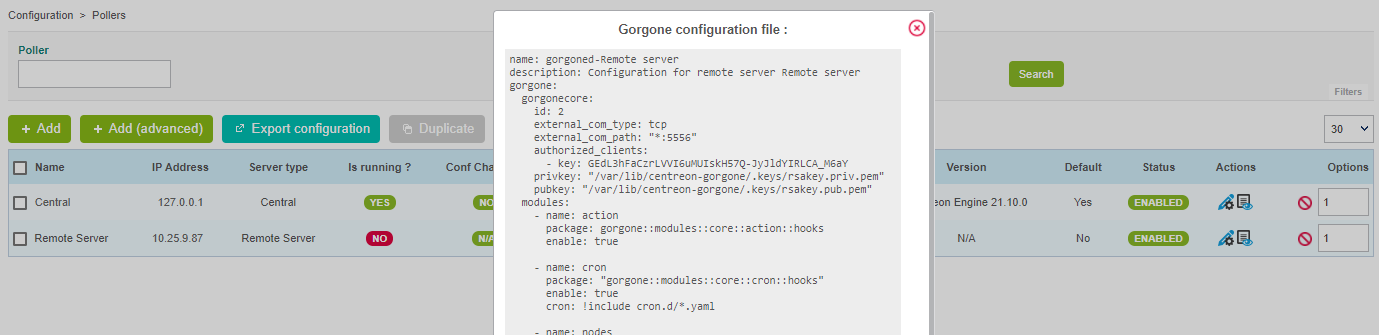
Paste the content of the clipboard directly into the Remote Server terminal as it contains the following content, and will fill the right file:
cat <<EOF > /etc/centreon-gorgone/config.d/40-gorgoned.yaml
name: gorgoned-My Remote Server
description: Configuration for remote server My Remote Server
gorgone:
  gorgonecore:
    id: 3
    external_com_type: tcp
    external_com_path: "*:5556"
    authorized_clients:
      - key: Np1wWwpbFD2I0MdeHWRlFx51FmlYkDRZy9JTFxkrDPI
    privkey: "/var/lib/centreon-gorgone/.keys/rsakey.priv.pem"
    pubkey: "/var/lib/centreon-gorgone/.keys/rsakey.pub.pem"
  modules:
    - name: action
      package: gorgone::modules::core::action::hooks
      enable: true

    - name: cron
      package: "gorgone::modules::core::cron::hooks"
      enable: true
      cron: !include cron.d/*.yaml

    - name: nodes
      package: gorgone::modules::centreon::nodes::hooks
      enable: true

    - name: proxy
      package: gorgone::modules::core::proxy::hooks
      enable: true

    - name: legacycmd
      package: gorgone::modules::centreon::legacycmd::hooks
      enable: true
      cmd_file: "/var/lib/centreon/centcore.cmd"
      cache_dir: "/var/cache/centreon/"
      cache_dir_trap: "/etc/snmp/centreon_traps/"
      remote_dir: "/var/cache/centreon/config/remote-data/"

    - name: engine
      package: gorgone::modules::centreon::engine::hooks
      enable: true
      command_file: "/var/lib/centreon-engine/rw/centengine.cmd"

    - name: statistics
      package: "gorgone::modules::centreon::statistics::hooks"
      enable: true
      broker_cache_dir: "/var/cache/centreon/broker-stats/"
      cron:
        - id: broker_stats
          timespec: "*/5 * * * *"
          action: BROKERSTATS
          parameters:
            timeout: 10
        - id: engine_stats
          timespec: "*/5 * * * *"
          action: ENGINESTATS
          parameters:
            timeout: 10

EOF
Hit the Enter key for the command to be applied.
You can copy the configuration in a custom file by copying the content from the pop-in.
Restart the Gorgone daemon:
From the Remote Server, run the following command to restart the Gorgone service:
systemctl restart gorgonedMake sure it is started by running the following command:
systemctl status gorgonedIt should result as follows:
● gorgoned.service - Centreon Gorgone
  Loaded: loaded (/etc/systemd/system/gorgoned.service; enabled; vendor preset: disabled)
  Active: active (running) since Wed 2020-03-24 19:45:00 CET; 6s ago
Main PID: 30902 (perl)
  CGroup: /system.slice/gorgoned.service
          ├─30902 /usr/bin/perl /usr/bin/gorgoned --config=/etc/centreon-gorgone/config.yaml --logfile=/var/log/centreon-gorgone/gorgoned.log --severity=info
          ├─30916 gorgone-nodes
          ├─30917 gorgone-dbcleaner
          ├─30924 gorgone-proxy
          ├─30925 gorgone-proxy
          ├─30938 gorgone-proxy
          ├─30944 gorgone-proxy
          ├─30946 gorgone-proxy
          ├─30959 gorgone-engine
          ├─30966 gorgone-action
          └─30967 gorgone-legacycmd

Mar 24 19:45:00 localhost.localdomain systemd[1]: Started Centreon Gorgone.
To force the Central's Gorgone daemon to connect to the Remote Server, restart it with the following command from the Central server:
systemctl restart gorgoned
Deprecated
This mode should not be used anymore as it does not allow data synchronisation between Central and Remote Server UI.
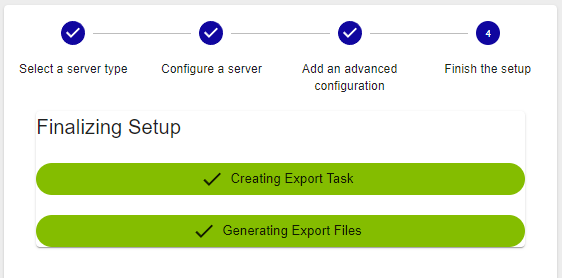
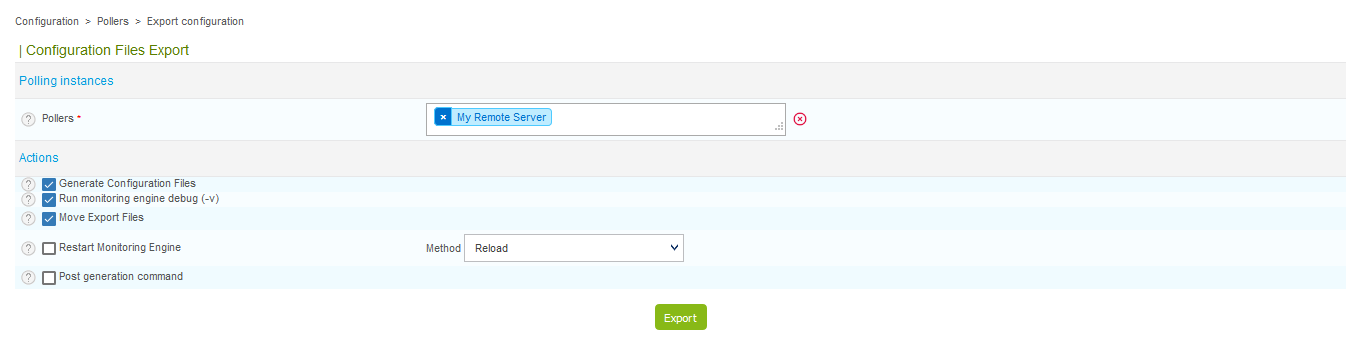
Step 3: Export the configuration
From the Pollers listing, select the Remote Server and click on Export configuration.
Then check the three first boxes and click on Export:
Finally, from the Remote Server, start/restart the collect processes:
systemctl restart cbd centengineThe Remote Server's Broker and Engine will then start and connect to the Central Broker.

Getting started
Go to the Getting Started chapter to configure your first monitoring.